


Hey dev, welcome back to our Budget App! I’m very happy to see you. Today, we
are going to continue working on our Budget App and connect the frontend with
the backend that we created in
this article.
This article will contain React project set up, Routing with
TanStack, and usage of MaterialUI and
Tailwind for our style. The source code you can find here!
This is how our App should look
like in the end:
I hope you are ready to have fun, so let’s get started!
Set Up our React App
Our first step will be to start the React application. As you might have
heard, the current create-react-app is deprecated, even we used it in our
previous articles it is not the way to go for the new projects.
So this time, we are going to use Vite – a build tool for the web. The command we
are going to use is:
$npm create vite@latest
You will be asked a few questions about what type of app you want,
so select React, TanStack Router, and No Rollup.
If you already have npm, answer No when asked to install it. Also, it is going to ask you about Router type - we are going to use file based routing, and Tailwind for styling.
Now after everything is installed, (and installed very fast 💪) we can clean up a little bit, and remove unnecessary files. Our important files here are __root.tsx, and index.tsx, which located in our routes folder. We are going to remove everything inside <div> in our index.tsx. Also, removing logos, and images in public folder.
If you run:
$ npm run dev
If you visit localhost:3000 it should be blank. If it's not, check index.tsx again.
Get our Routing Right
Now that everything is nice and clean, we can start our work. Our app is going to have two pages: the home page and the budget page. This is why we need routes, so our users can navigate across the app. First of all, let’s create our routes file. Make sure you are in src and enter this command:
$ touch router.ts
Inside we are going to place this code:
import { createRouter } from "@tanstack/react-router";
import { routeTree } from "./routeTree.gen";

// Create the router instance
export const router = createRouter({
  routeTree,
  context: {},
  defaultPreload: "intent",
});
Here we create the router instance, and we use our routeTree (auto generated) that has all defined routes, our context supposed to be empty this time but we can pass shared data into our routes, like user for example.
Let's go inside index.ts to make sure you have this piece of code:
export const Route = createFileRoute("/")({
  component: App,
});
This file is actually used to auto-generate our Route Tree. If you don't have it in your file, add it above the function App(). Since I mentioned that our app needs two pages, we can go ahead and create a new file and add a route to it:
## Make sure you are in /src/routes
$ mkdir budget
$ cd budget
$ touch index.tsx
We created a new folder inside our routes. Then, inside this folder, we created index.tsx, which is going to be our component for displaying expenses and income. Currently, it is empty, but if you run the app, your code should look like this:
import { createFileRoute } from "@tanstack/react-router";

export const Route = createFileRoute("/budget/")({
  component: RouteComponent,
});

function RouteComponent() {
  return <div>Hello "/budget/"!</div>;
}
Update our Home and Budget Pages
This is our time to start building. Let's start with a simple index.tsx file in our root folder. Our Home component should look like this:
import { createFileRoute, Link } from "@tanstack/react-router";

export const Route = createFileRoute("/")({
  component: HomeComponent,
});

function HomeComponent() {
  return (
    <div className="flex justify-around items-center min-h-screen bg-[#f3de2c] font-league p-10">
      <section className="mt-10 ml-12 max-w-lg">
        <h1 className="font-bold text-8xl text-[#ff7b00] mb-7">Budgetify</h1>
        <h3 className="text-3xl text-[#0d3a5c] font-medium">
          We are helping individuals manage your funds and track expenses. No
          joining fees, no hassle.
        </h3>
        <Link
          to="/budget"
          className="flex gap-2 items-center text-xl cursor-pointer"
        >
          <button className="mt-10 bg-[#0d3a5c] text-amber-50 px-16 py-3 text-2xl rounded-xl cursor-pointer hover:bg-[#0b2e4c] transition">
            Start Now
          </button>
        </Link>
      </section>
      <section>
        <img src="./image.svg" alt="credit cards" className="w-[900px]" />
      </section>
    </div>
  );
}
We are using Tailwind styling in the className attribute. For the image, you might need to find your own and add it to your public folder. Also, you may notice that our button is wrapped in a Link tag. This is part of the TanStack navigation system, we use the to attribute to define our route. Since we already created our second page, when the user clicks the button, it will navigate them to the Budget page.
At this point our locahost:3000 should look like this image:

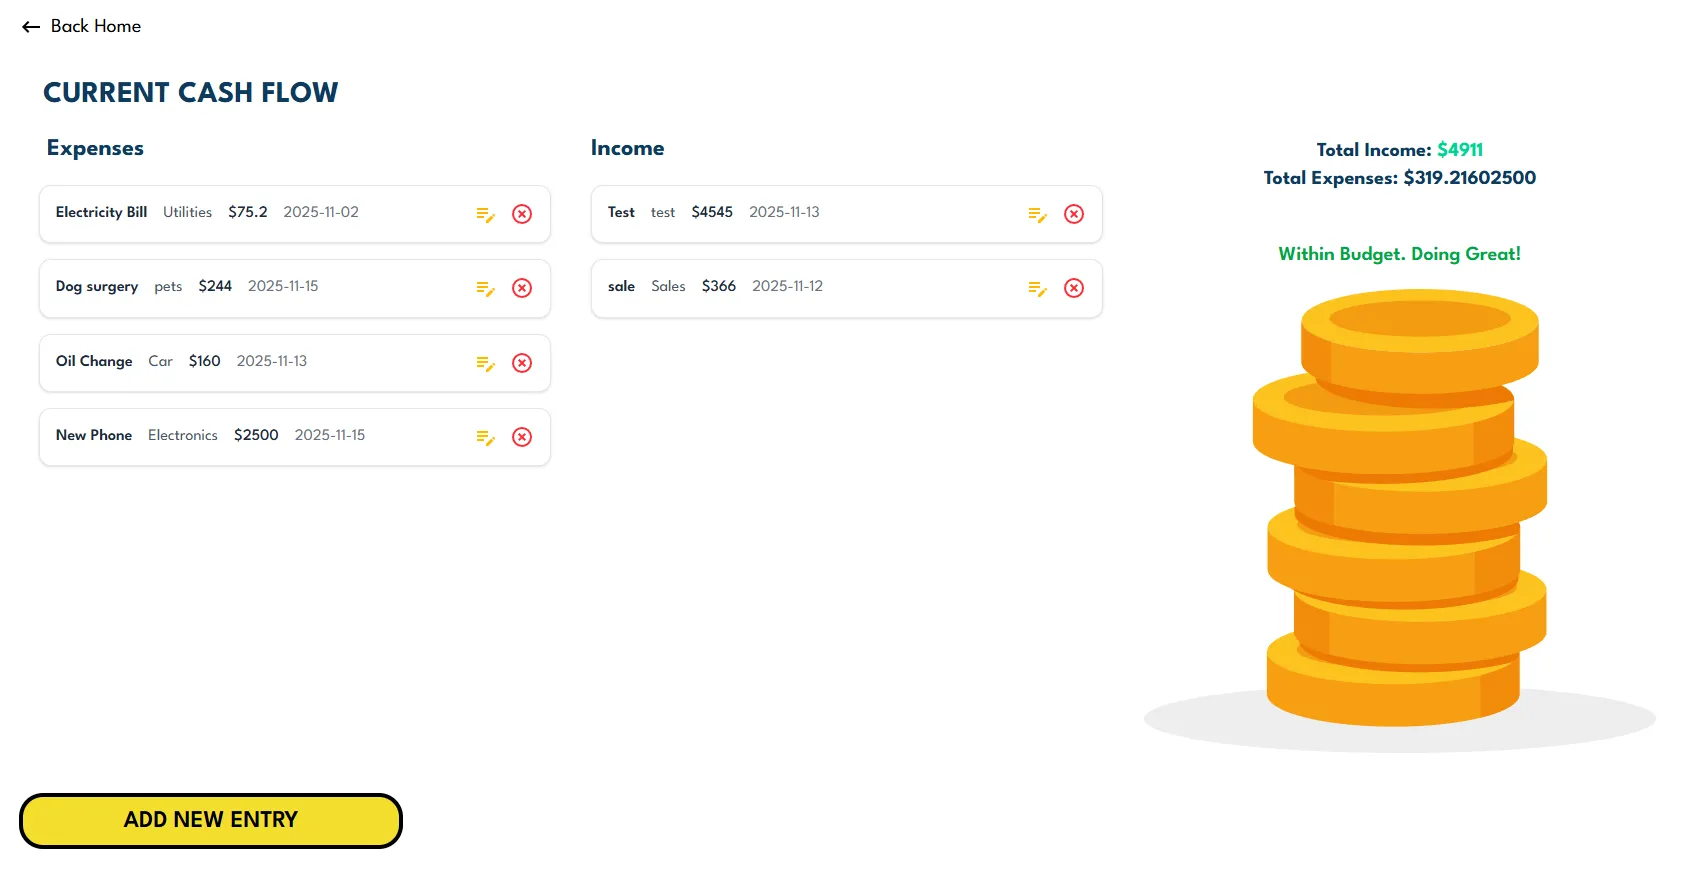
Now we can start working on our main functionality. Let's move to our budget/index.tsx file. We need to display two lists: Expense and Income. A separate component can handle those lists. We also want to add a dashboard that will tell the user whether they are overspending or not, and we want to include a way for the user to return to the Home page.
So our initial code will look like this:
import KeyboardBackspaceIcon from "@mui/icons-material/KeyboardBackspace";
import { createFileRoute, Link } from "@tanstack/react-router";

export const Route = createFileRoute("/budget/")({
  component: BudgetPage,
});

export default function BudgetPage() {
  return (
    <div className="p-6  mx-auto">
      <Link to="/" className="flex gap-2 items-center text-xl cursor-pointer">
        <KeyboardBackspaceIcon />
        <span>Back Home</span>
      </Link>
      <h1 className="text-3xl font-bold text-[#0d3a5c]  ml-6 mt-9">
        CURRENT CASH FLOW
      </h1>
      <section className="flex gap-10 ml-5 mb-10">
        <div>
          <h2 className="text-2xl font-bold text-[#0d3a5c] ml-2 my-5">
            Expenses
          </h2>
          {/*Component for Expenses*/}
        </div>
        <div>
          <h2 className="text-2xl font-bold text-[#0d3a5c]   my-5">Income</h2>
          {/*Component for Income*/}
        </div>
        <div>{/*Component for Dashboard*/}</div>
      </section>

      <section className="flex justify-between items-center">
        {/*Component for Adding new Entry*/}
      </section>
    </div>
  );
}
We now have our basic tsx code where we defined some styles using Tailwind. Next, let's create a new component that will render our Expense and Income lists. We will pass these arrays from the parent component as props.
Create a new folder inside your src directory and name it Components. Inside this folder, create a new file called BudgetLists.tsx. Our initial code will look like this:
// src/Components/BudgetLists.tsx

type BudgetListsProps = {
  list: Expense[] | Income[]
  type: string
  updateEntry: (item: Expense | Income, type:string) => void
  deleteListItem: (id: number, type: string) => void
}

const BudgetLists = ({
  list,
  updateEntry,
  type,
  deleteListItem,
}: BudgetListsProps) => {

  // Our Lists will display edit mode and viewing and useState is going to help with it
  const [editingMode, setEditingMode] = useState<boolean>(false)
  const [editingId, setEditingId] = useState<number | null>(null)

  return (
 <div className="space-y-4">
  {list.length === 0 ? (
   <p className="text-center text-gray-500">No records yet.</p>)
   : (
      list.map((item) => (
        <div
          key={item.id}
          className="flex flex-col md:flex-row md:items-center justify-between bg-white border border-gray-200 rounded-xl p-4 w-lg shadow-sm hover:shadow-md transition-shadow"
        >
        {editingMode && editingId === item.id ? (
    // EDIT MODE - this is what user will see if they decide to edit the list item
    <div className="flex flex-wrap gap-2 w-full items-center">
        <input
          type="text"
          defaultValue={item.name}
          className="border-b border-gray-300 px-1 py-0.5 w-24 text-sm"
          onChange={(e) => (item.name = e.target.value)}/>
            <input
              type="text"
              defaultValue={item.category}
              className="border-b border-gray-300 px-1 py-0.5 w-24 text-sm"
              onChange={(e) => (item.category = e.target.value)}/>
            <input
              type="number"
              defaultValue={item.amount}
              className="border-b border-gray-300 px-1 py-0.5 w-20 text-sm"
              onChange={(e) => (item.amount = Number(e.target.value))} />
            <input
              type="date"
              defaultValue={item.date.split('T')[0]}
              className="border-b border-gray-300 px-1 py-0.5 w-32 text-sm"
              onChange={(e) => (item.date = e.target.value)}/>
            <button
             className="text-green-500 hover:text-green-700 text-sm px-2 py-1"
             onClick={() => {
             updateEntry(item, type)
             setEditingMode(false)
             setEditingId(null)}}>Save</button>
            <button
             className="text-gray-500 hover:text-gray-700 text-sm px-2 py-1"
             onClick={() => {
             setEditingMode(false)
             setEditingId(null)}}>Cancel</button>
              </div>
            ) : (
    // VIEW MODE
    // If user in view mode (initial mode) they only see data that was passed with properties from parent

              <>
                <div className="flex flex-col md:flex-row md:items-center gap-4">
                  <span className="font-semibold text-gray-800 w-32 md:w-auto">
                    {item.name}
                  </span>
                  <span className="text-gray-600 w-32 md:w-auto">
                    {item.category}
                  </span>
                  <span className="text-gray-800 font-medium">
                    ${item.amount}
                  </span>
                  <span className="text-gray-500">
                    {item.date.split('T')[0]}
                  </span>
                </div>

                {// Editing Icon is responsible to enable editing mode}
                <div className="flex items-center gap-3 mt-2 md:mt-0">
                  <button
                    className="text-amber-400 hover:text-blue-700"
                    onClick={() => {
                      setEditingMode(true)
                      setEditingId(item.id)
                    }}
                  >
                    <EditNoteIcon />
                  </button>

                {// Delete Icon is calling parent method to handle item deletion}
                  <button
                    className="text-red-500 hover:text-red-700"
                    onClick={() => deleteListItem(item.id, type)}
                  >
                    <HighlightOffIcon />
                  </button>
                </div>
              </>
            )}
          </div>
        ))
      )}
    </div>
  )
}

export default BudgetLists
Let's review what this code does. We have a BudgetListsProps interface that defines the properties our list expects from the parent component. The list receives an array that can be either Expense or Income, as well as parent methods that we can call when needed. This is how we trigger functions in the parent from a child component.
Our list has two modes: view and edit. Using a useState hook, we control which mode is active. When edit mode is enabled, the user sees input fields and can update the data. This triggers parent component's method to perform desired action - call API and update the list.
Let's go ahead and update our budget/index.tsx by adding Expense and Income API calls to our list:
// src/routes/budget/index.tsx

//After const Route variable we add types for Expense and Income
export type Expense = {
  id: number;
  name: string;
  category: string;
  amount: number;
  date: string;
};

export type Income = {
  id: number;
  name: string;
  category: string;
  amount: number;
  date: string;
};

export default function BudgetPage() {

 // Adding new variables that will represents our lists
  const [expenses, setExpenses] = useState<Expense[]>([]);
  const [incomes, setIncomes] = useState<Income[]>([]);

//Getting the data when component loads
  useEffect(() => {
    fetchBudget();
  }, []);

// Fires when user updated lists
  const updateEntry = async (item: Expense | Income, type: string) => {
    if (type == "expense") {
      const response = await fetch(`http://localhost:8080/expense`, {
        method: "PUT",
        headers: {
          "Content-Type": "application/json",
        },
        body: JSON.stringify(item),
      });
    } else {
      const response = await fetch(`http://localhost:8080/income`, {
        method: "PUT",
        headers: {
          "Content-Type": "application/json",
        },
        body: JSON.stringify(item),
      });
    }
  };

// Fires when user delete item from lists

  const deleteEntry = async (id: number, type: string) => {
    if (type == "expense") {
      let response = await fetch(
        `http://localhost:8080/expense/removeExpense/${id}`,
        { method: "DELETE" }
      );
      setExpenses(expenses.filter((ex) => ex.id != id));
    } else {
      let response = await fetch(
        `http://localhost:8080/income/removeIncome/${id}`,
        { method: "DELETE" }
      );
      setIncomes(incomes.filter((inc) => inc.id != id));
    }
  };

  const fetchBudget = async () => {
    const expenses = await fetch("http://localhost:8080/expense");
    const expensesData = await expenses.json();
    setExpenses(expensesData);

    const income = await fetch("http://localhost:8080/income");
    const incomeData = await income.json();
    setIncomes(incomeData);
  };

    return (
  // Some of the prev code
  // Updateing our section and Adding our BudgetList Component here
   <section className="flex gap-10 ml-5 mb-10">
        <div>
          <h2 className="text-2xl font-bold text-[#0d3a5c] ml-2 my-5">
            Expenses
          </h2>
          <BudgetLists
            list={expenses}
            type="expense"
            updateEntry={updateEntry}
            deleteListItem={deleteEntry}
          ></BudgetLists>
        </div>
        <div>
          <h2 className="text-2xl font-bold text-[#0d3a5c]   my-5">Income</h2>
          <BudgetLists
            list={incomes}
            type="income"
            updateEntry={updateEntry}
            deleteListItem={deleteEntry}
          ></BudgetLists>
        </div>
    <div>{/*Component for Dashboard*/}</div>
      </section>

}
Here we added two useState hooks that capture the state of the expense and income lists. We used useEffect to fetch the initial data from our backend API using the GET method. The updateEntry and deleteEntry functions execute API calls when the child component BudgetList triggers them. We also update our UI through the BudgetList components.
Now let's create another component that will display data about overspending the Dashboard component. We are going to create a new file in the Components folder and name it SpendingDashBoard.tsx. Inside, we will place the following code:
// src/Components/SpendingDashBoard.tsx
import type { Expense, Income } from "@/routes/budget";

type SpendingDashBoardProps = {
  expenses: Expense[];
  income: Income[];
};
export default function SpendingDashBoard({
  expenses,
  income,
}: SpendingDashBoardProps) {
  const totalExpenses = expenses.reduce((sum, exp) => sum + exp.amount, 0);
  const totalIncome = income.reduce((sum, inc) => sum + inc.amount, 0);
  const overspending = totalExpenses > totalIncome;

  return (
    <div className="max-w-6xlg ">
      {/* Summary */}
      <div className="mb-6 p-6 rounded-lg text-[#0d3a5c] flex justify-center items-center">
        <div>
          <p className="text-xl font-bold text-center">
            Total Income:{" "}
            <span className="text-emerald-400">${totalIncome}</span>
          </p>
          <p className="text-xl font-bold text-center ">
            Total Expenses: ${totalExpenses}
          </p>
        </div>
      </div>
      <div className="text-xl font-semibold text-center mt-5">
        {overspending ? (
          <p className="text-red-600">Overspending! Time to cut Expenses</p>
        ) : (
          <p className="text-green-600">Within Budget. Doing Great!</p>
        )}
        <img
          alt="budget line"
          className="w-lg mt-5"
          src={totalExpenses > totalIncome ? "wallet.svg" : "coin-stack.svg"}
        />
      </div>
    </div>
  );
}
We created a new type for accepting props, SpendingDashBoardProps, which includes a list of expenses and income. Inside our component, we defined totalIncome, totalSpending, and overspending as booleans. Our UI will display different images and texts depending on whether the user overspends or not.
Before we update our index.tsx, let's create the last component that will handle the logic for adding a new expense or income. Create a new file in the Components folder and name it AddNewEntryBtn.tsx. Inside, place the following code:
//src/Components/AddNewEntryBtn.tsx
import { useState } from "react";
import { RadioGroup, FormControlLabel, Radio } from "@mui/material";
import CancelIcon from "@mui/icons-material/Cancel";
import type { Expense, Income } from "@/routes/budget";

type AddEntryProps = {
  refreshUI: (item: Expense | Income, type: string) => void;
};

const AddNewEntryBtn = ({ refreshUI }: AddEntryProps) => {

// Setting new form on and off
  const [displayForm, setFormDisplay] = useState(false);
  const [selectedBtn, setSelectedBtn] = useState("income");

  const handleSubmit = async (e: any) => {
    e.preventDefault();

    const body = {
      name: e.target.title.value,
      amount: e.target.amount.value,
      category: e.target.category.value,
      date: e.target.date.value,
    };

    // Call API
    // /expenses and /income
    let endpoint = selectedBtn[0].toUpperCase() + selectedBtn.slice(1);

    const response = await fetch(
      `http://localhost:8080/${selectedBtn.toLowerCase()}/add${endpoint}`,
      {
        method: "POST",
        headers: { "Content-Type": "application/json" },
        body: JSON.stringify(body),
      }
    );
    const data = await response.json();
    setFormDisplay(false);
    refreshUI(body, endpoint);
  };

  return (
    <section>
      {displayForm && (
        <div
          className="  fixed inset-0
  flex items-center justify-center
  backdrop-blur-md bg-black/40
  z-50"
        >
          <form
            className="flex flex-col gap-5 bg-white p-6 rounded-3xl shadow-lg w-full max-w-md mx-auto"
            onSubmit={handleSubmit}
          >
            <h2 className="text-3xl font-bold  text-gray-800 flex justify-between items-center">
              <span>
                Add New {selectedBtn[0].toUpperCase() + selectedBtn.slice(1)}
              </span>
              <CancelIcon
                sx={{ color: "#DF3A3A" }}
                onClick={() => setFormDisplay(false)}
              ></CancelIcon>
            </h2>
            <label className="text-lg font-semibold text-gray-700">
              Select type:
            </label>
            <RadioGroup
              name="budget-type"
              value={selectedBtn}
              onChange={(e) => setSelectedBtn(e.target.value)}
            >
              <div className="flex items-center gap-4">
                <FormControlLabel
                  value="income"
                  control={<Radio color="warning" />}
                  label="Income"
                />

                <FormControlLabel
                  value="expense"
                  control={<Radio color="warning" />}
                  label="Expense"
                />
              </div>
            </RadioGroup>
            <div>
              <label className="block text-lg font-semibold text-gray-700 mb-1">
                {selectedBtn[0].toUpperCase() + selectedBtn.slice(1)} Title
              </label>
              <input
                type="text"
                required
                name="title"
                className="w-sm border-2 border-gray-300 rounded-xl px-4 py-2 focus:border-yellow-400 focus:ring-2 focus:ring-yellow-300 outline-none"
              />
            </div>

            <div>
              <label className="block text- font-semibold text-gray-700 mb-1">
                Category
              </label>
              <input
                type="text"
                required
                name="category"
                className="w-sm border-2 border-gray-300 rounded-xl px-4 py-2 focus:border-yellow-400 focus:ring-2 focus:ring-yellow-300 outline-none"
              />
            </div>

            <div>
              <label className="block text-lg font-semibold text-gray-700 mb-1">
                Amount
              </label>
              <input
                type="number"
                required
                name="amount"
                className="w-sm border-2 border-gray-300 rounded-xl px-4 py-2 focus:border-yellow-400 focus:ring-2 focus:ring-yellow-300 outline-none"
              />
            </div>

            <label className="block text-lg font-semibold text-gray-700 mb-1">
              Date
            </label>
            <input
              type="date"
              required
              name="date"
              className="w-sm border-2 border-gray-300 rounded-xl px-4 py-2 focus:border-yellow-400 focus:ring-2 focus:ring-yellow-300 outline-none"
            />
            <button
              type="submit"
              className="block my-4 w-sm border-4 text-2xl bg-[#f3de2c] rounded-3xl px-5 py-2 font-semibold"
            >
              Submit
            </button>
          </form>
        </div>
      )}

      {!displayForm && (
        <button
          className=" m-auto w-sm border-4 text-2xl bg-[#f3de2c] rounded-3xl px-5 py-2 font-semibold"
          onClick={() => setFormDisplay((prev) => !prev)}
        >
          ADD NEW ENTRY
        </button>
      )}
    </section>
  );
};

export default AddNewEntryBtn;
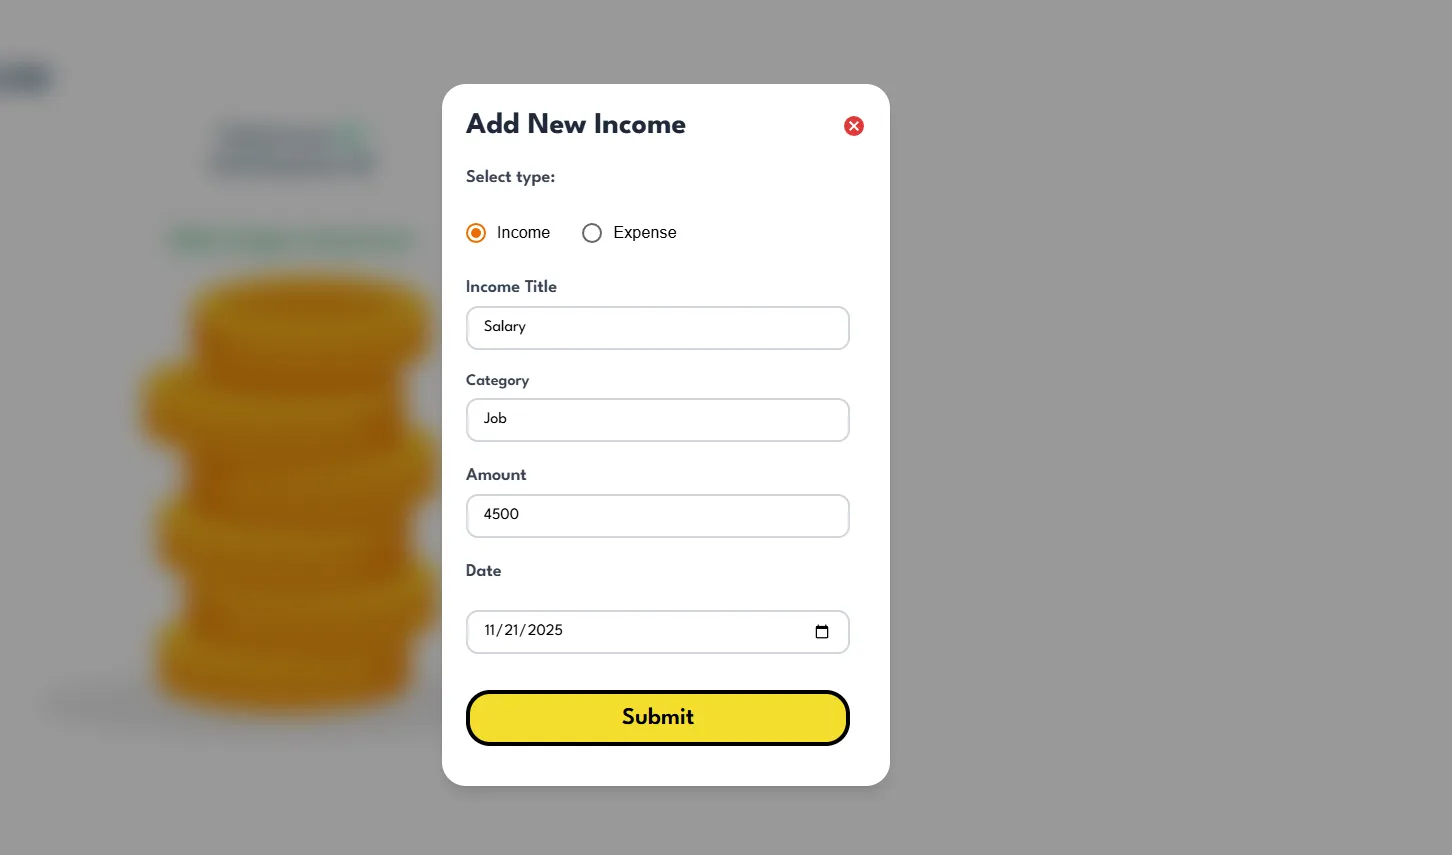
We created two useEffect variables that will manage the visibility of our Add Entry button and the form itself. When the user clicks the button, the form will be displayed. After filling out the form and submitting it, we will send an API call to our backend to add either an income or an expense. The form should look like this:
Now, let's update our index.tsx and add all nessesary components, so updated file will look like this:
// routes/index.tsx

// prev code
export default function BudgetPage() {
  const [expenses, setExpenses] = useState<Expense[]>([])

  const [incomes, setIncomes] = useState<Income[]>([])

  useEffect(() => {
    fetchBudget()
  }, [])

  const refreshUI = (newItem: Expense | Income, type: string) => {
    if (type == 'Expense') {
      setExpenses((prev) => [...prev, newItem])
    } else {
      setIncomes((prev) => [...prev, newItem])
    }
  }

  const updateEntry = async (item: Expense | Income, type: string) => {
    if (type == 'expense') {
      const response = await fetch(`http://localhost:8080/expense`, {
        method: 'PUT',
        headers: {
          'Content-Type': 'application/json',
        },
        body: JSON.stringify(item),
      })
    } else {
      const response = await fetch(`http://localhost:8080/income`, {
        method: 'PUT',
        headers: {
          'Content-Type': 'application/json',
        },
        body: JSON.stringify(item),
      })
    }
  }

  const deleteEntry = async (id: number, type: string) => {
    if (type == 'expense') {
      let response = await fetch(
        `http://localhost:8080/expense/removeExpense/${id}`,
        { method: 'DELETE' },
      )
      setExpenses(expenses.filter((ex) => ex.id != id))
    } else {
      let response = await fetch(
        `http://localhost:8080/income/removeIncome/${id}`,
        { method: 'DELETE' },
      )
      setIncomes(incomes.filter((inc) => inc.id != id))
    }
  }

  const fetchBudget = async () => {
    const expenses = await fetch('http://localhost:8080/expense')
    const expensesData = await expenses.json()
    setExpenses(expensesData)

    const income = await fetch('http://localhost:8080/income')
    const incomeData = await income.json()
    setIncomes(incomeData)
  }

  return (
    <div className="p-6  mx-auto">
      <Link
      to="/"
      className="flex gap-2 items-center text-xl cursor-pointer"
    >
      <KeyboardBackspaceIcon />
      <span>Back Home</span>
    </Link>
      <h1 className="text-3xl font-bold text-[#0d3a5c]  ml-6 mt-9">
        CURRENT CASH FLOW
      </h1>
      <section className="flex gap-10 ml-5 mb-10">
        <div>
          <h2 className="text-2xl font-bold text-[#0d3a5c] ml-2 my-5">
            Expenses
          </h2>
          <BudgetLists
            list={expenses}
            type="expense"
            updateEntry={updateEntry}
            deleteListItem={deleteEntry}
          ></BudgetLists>
        </div>
        <div>
          <h2 className="text-2xl font-bold text-[#0d3a5c]   my-5">Income</h2>
          <BudgetLists
            list={incomes}
            type="income"
            updateEntry={updateEntry}
            deleteListItem={deleteEntry}
          ></BudgetLists>
        </div>
        <div>
          <SpendingDashBoard
            expenses={expenses}
            income={incomes}
          ></SpendingDashBoard>
        </div>
      </section>

      <section className="flex justify-between items-center">
        <AddNewEntryBtn refreshUI={refreshUI}></AddNewEntryBtn>
      </section>
    </div>
  )
}
We added the SpendingDashBoard component with expenses and income as parameters. We also added the AddNewEntryBtn component. Now, if we run our app:
$ npm run dev
Make sure your backend is running, and then go to our browser at localhost:3000/budget, you should see:
That's it for our front-end part!
Before I let you go, I just want to remind you that I have a YouTube channel where I share hands-on tutorials that can help you learn even more effectively.
Thank you for reading, and Happy Coding 🚀!


Comments