


Hey dev, nice to see you again! I hope you're ready for our new project. Today we’re going to build a Budget Tracker app. We’ll learn about Spring Boot, how to set up a local testing database using H2, and we’ll create a nice, fancy frontend with React. As usual, here is the source code, so you can inspect it. I hope you’re as excited as I am so let’s get started!
For my readers who prefer to watch videos, you can check this out:
Java vs Spring vs Spring Boot?
As usual, since this is my first post about Spring Boot, I want to explain what it is. Java is the main language we will use to create our application, but it doesn’t include built-in tools for building web apps.
That’s why we need external help—and this is where the Spring Framework comes in.
Spring is built on top of Java and provides a lot of powerful features such as dependency injection, controllers, database access, and much more. However, Spring on its own isn’t always simple to configure.
That’s where Spring Boot comes in. Spring Boot is an extension of Spring that makes our lives even easier. It simplifies configuration, reduces boilerplate, and helps us set up projects much faster.
This is why we’re choosing Spring Boot for our project because it offers easier configuration and a smoother project setup.
Now that everything is clear, we can move on to the development.
Pre-requisites
To make sure we are on the same page, I want to share what SDK and builders I have installed:
👉 Java 21 get on the official website
👉 Apache Maven 3.9.11 - Get it here
The project set up
Our project setup starts with creating a Spring Boot folder that includes all the necessary dependencies, so it’s ready for us to begin. To do this, we need to go to the Spring Boot website and select all the tools we’ll be using in our project.
This is how it should look like:
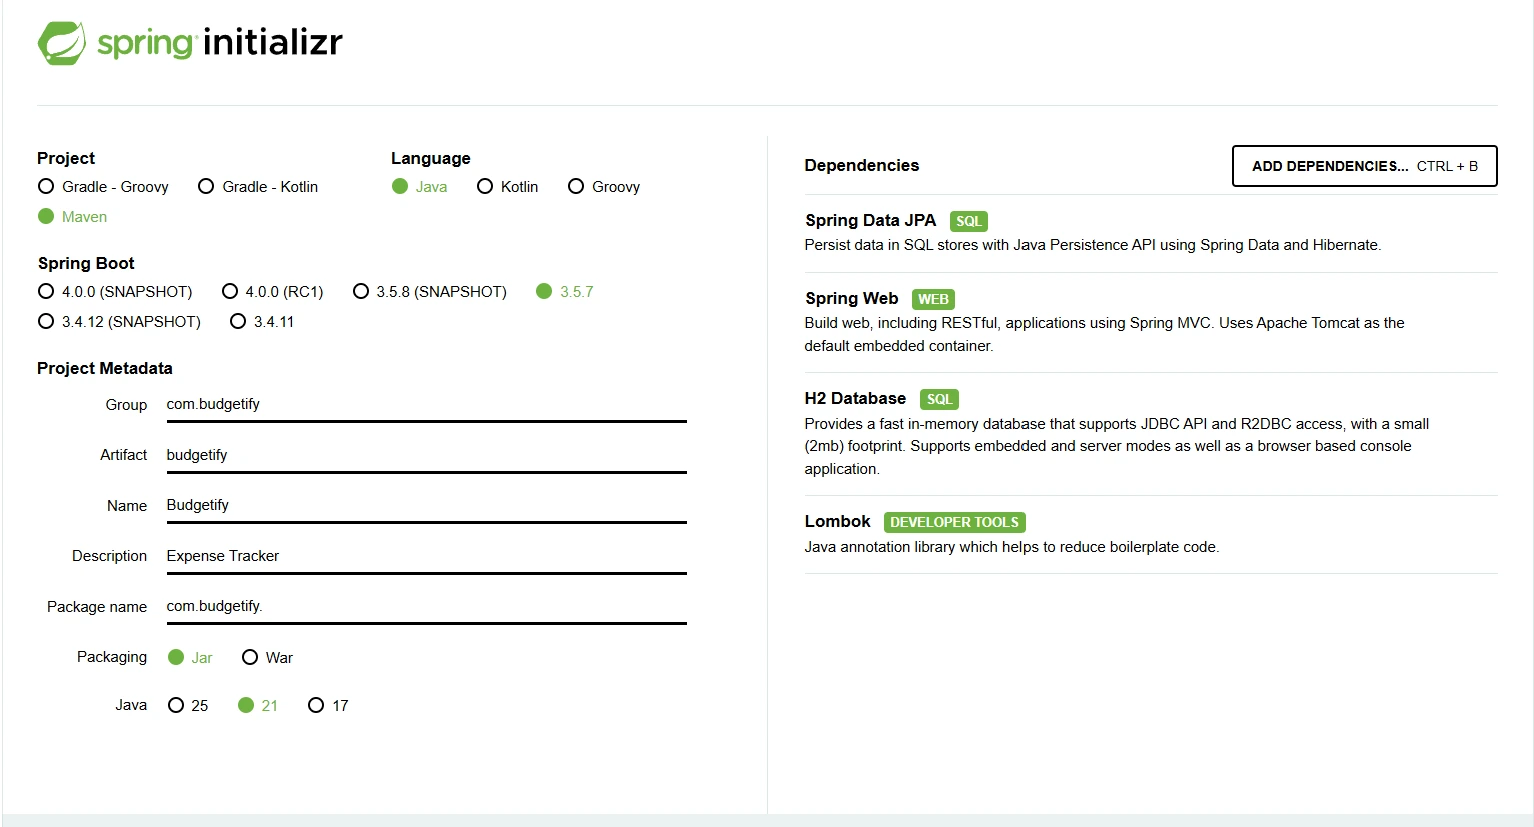
We selected Maven, Spring Boot version 3.5.7, and Java 21 because that’s what I already have installed on my machine. Now we can click Generate button, and our project.
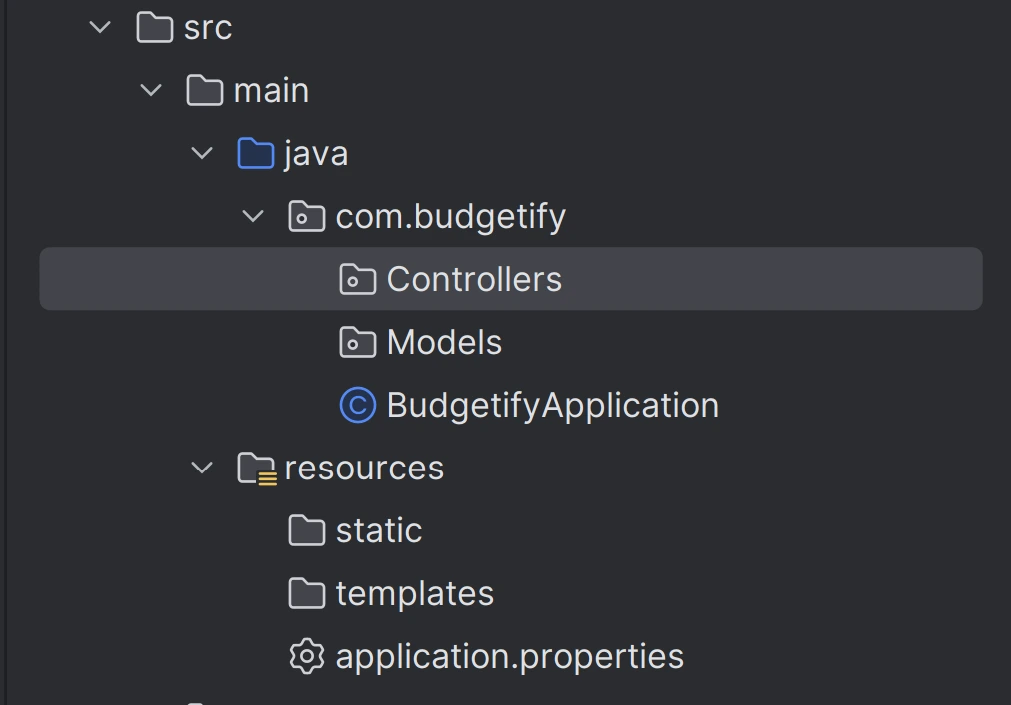
I’m going to work in IntelliJ, and after opening my newly generated project, it looks like this:

Creating Models and Controllers
So, let’s talk about what we want to build. Our goal is to create the Budgetify application, which will allow users to view, add, remove, and update their expenses and income.
Building Models
To do that, we need to create entities that represent our data. For expenses, we’ll store the name, amount, category, and date of the expense. We will do something similar for income. This is exactly what our models are for.
So let’s create a new package (folder) called Models. Inside it, I’m going to create two files: Expense.java and Income.java. The following code will go inside Expense.java:
package com.budgetify.Models; // this is our namespace, that defines our package

// Necessary imports to be able to use Lombok and Spring Boot annotations
import jakarta.persistence.Entity;
import jakarta.persistence.GeneratedValue;
import jakarta.persistence.GenerationType;
import jakarta.persistence.Id;
import jakarta.persistence.Table;
import lombok.AllArgsConstructor;
import lombok.Data;

import java.util.Date;

@Entity  // Spring Boot Java Persistance (JPA) will ma
@Table(name = "expense")// we tell our Hibernate to treat this model as table with name expense
@Data // this part of lombok package, we tell it to generate getters and setters for our model
@AllArgsConstructor // lombok also will generate constructor for us
public class Expense {

    @Id
    @GeneratedValue(strategy = GenerationType.IDENTITY)
    private Integer id;
    private String name;
    private double amount;
    private String category;
    private Date date;

    public Expense(){}

}
So, a quick look at our code:
We imported all the necessary packages to use JPA (Java Persistence API). Instead of writing SQL and manually creating tables we can delegate this to JPA and its provider, Hibernate.
The @Entity and @Table annotations tell JPA to treat this model as a table in our H2 database and name it "expense". @Data and @AllArgsConstructor are part of the Lombok package, which eliminates boilerplate code we would otherwise need to write, so there’s no need for getters and setters.
The Expense class itself has an id that will be generated automatically using annotations, while the other fields will be provided by our users.
Now let's do the same for our Income.java file
package com.budgetify.Models;

import lombok.*;
import jakarta.persistence.*;

import java.util.Date;

@Entity
@Table(name = "income")
@Data
@AllArgsConstructor
public class Income {
        @jakarta.persistence.Id
        @GeneratedValue(strategy = GenerationType.IDENTITY)
        private Integer Id;
        private String name;
        private double amount;
        private String category;
        private Date date;


        public Income(){}
}
As you can see, we have the same thing here. Except we have fewer package declarations because we imported all of them using lombok.*. The * means “import everything” from Lombok.
Implementing Controllers
Controllers are an essential part of our API. This is where we define our routes so that users can call them to perform certain actions, such as create, delete, update, and so on.
Basically, this is how we tell our service to process requests depending on the HTTP method and route. We are going to create a new folder/package in our app and name it Controllers. It should be at the same folder level as Models.
Inside we are going to create a new file named ExpenseController.java. The code inside should be following:
package com.budgetify.Controllers;

import com.budgetify.Interfaces.IExpenseService;
import com.budgetify.Models.Expense;
import org.springframework.web.bind.annotation.*;

import java.util.List;

@RestController // SpringBoot annotation to tell our app that this file is used as Controller
@RequestMapping("/expenses") // this is how we are going to access our action methods, having route. Example: localhost:8080/expenses
public class ExpenseController {

    private final IExpenseService expenseService; // this is a variable that is going to hold our Service

    public ExpenseController(IExpenseService  exService){ // performing dependency injection in constructor
        this.expenseService = exService;
    }

    @GetMapping // annotation for GET action
    public List<Expense> getExpensesList(){

        return expenseService.getAllExpenses(); // calling our service method to return all expenses we have
    }

    @PostMapping("/addExpense")
    public Expense addExpense (@RequestBody Expense newExpense){

        return expenseService.addNewExpense(newExpense);
    }
    @DeleteMapping("/removeExpense/{id}")
    public String removeExpense(@PathVariable Integer id){

        return expenseService.RemoveExpense(id);
    }

    @PutMapping("/updateExpense/{id}")
    public Expense updateExpense(@RequestBody Expense expense){

        return expenseService.UpdateExpense(expense);
    }
}
So, our controller defines 4 routes for retrieving, adding, deleting, and updating expenses.
We have not implemented the service that will contain the actual business logic yet, but we will do that soon.
This is a very basic example to show how things work, and in production, of course, your controllers might have many more actions and return different types of data.
As you may notice, our GET method’s signature: getExpensesList() tells us that the method returns a list of expenses.
Other methods return either a String (for delete actions) or an Expense object itself. You can design your API to return different types of data depending on your app’s needs.
Let’s add our Income Controller to controllers folder as well. I am going to name IncomeController.java.
package com.budgetify.Controllers;

import com.budgetify.Models.Expense;
import com.budgetify.Models.Income;
import com.budgetify.Interfaces.IIncomeService;
import org.springframework.web.bind.annotation.*;

import java.util.List;

@RestController
@RequestMapping("/income")
public class IncomeController {
    private final IIncomeService incomeService;

    public IncomeController(IIncomeService inService){
        this.incomeService = inService;
    }

    @GetMapping
    public List<Income> getIncomeList(){

        return incomeService.getAllIncomeSources();
    }

    @PostMapping("/addIncomeSource")
    public Income addIncome (@RequestBody Income incomeSource){

        return incomeService.addNewIncomeSource(incomeSource);
    }

    @DeleteMapping("/removeIncome/{id}")
    public String removeIncome(@PathVariable Integer id){

        return incomeService.RemoveIncomeSource(id);
    }

    @PutMapping("/updateIncome")
    public Income updateIncome(@RequestBody Income income){

        return incomeService.UpdateIncomeSource(income);
    }
}
Looks similar, but instead of ExpenseService, we are using IncomeService.
Remember the principle of separation of concerns: one class, one responsibility. This is why it makes sense to create separate business logic classes for income and expenses.Also, we have different routes here. To access our API methods, the path will be like localhost:8080/income/{endpointName}.
Adding Service Layer and Repository
Creating Services
We have defined our Models and Controllers, and now we need to implement the logic that performs the actual actions calling our database, handling data transformation and validation, and returning the result back to the controller.
All of this happens in the Service Layer. So we are going to create two new packages: Interfaces and Services.
The best practice is: One Service → One Interface.
What is an interface? It is a contract that tells your class which methods must be implemented. For example, if an interface defines a create() method, then any class implementing that interface must provide that method.
We use interfaces to achieve abstraction, and they also make testing easier because we can use dynamic type substitution or mocks.
So, we create our actual service class, such as ExpenseService, which implements IExpenseService and defines all the required behaviors inside it. Let's create a new interface in our Interfaces package
// IExpenseService.java - our interface

package com.budgetify.Interfaces;

import com.budgetify.Models.Expense;
import java.util.List;

// This interface define what methods should be created in class that implements IExpenseService
public interface IExpenseService {

    public List<Expense> getAllExpenses();
    public Expense addNewExpense(Expense expense);
    public String RemoveExpense(Integer id);
    public Expense UpdateExpense(Expense expense);
}
Now we actually ready to create ExpenseService.java in Services package
package com.budgetify.Services;

import com.budgetify.Data.IExpenseRepository;
import com.budgetify.Interfaces.IExpenseService;
import com.budgetify.Models.Expense;
import org.springframework.stereotype.Service;

import java.util.List;
import java.util.Optional;

@Service // telling our SpringBoot to treat is as Service
public class ExpenseService implements IExpenseService { // implementing our Interface

    // Dependency Injection for our future repository
    public final IExpenseRepository repository;

    public ExpenseService(IExpenseRepository repo){
        this.repository = repo;
    }

    // Here we defining our interface methods and give it actual behavior
    @Override
    public List<Expense> getAllExpenses() {

        return repository.findAll();
    }

    // Trying to save new Expense into our repository
    @Override
    public Expense addNewExpense(Expense expense) {

        try{
            return repository.save(expense);
        }
        catch (Exception ex){
            throw new RuntimeException("Can't save expense");
        }
    }

    @Override
    public String RemoveExpense(Integer id){
        try{
            this.repository.deleteById(id);
            return "The expense was removed";
        }
        catch (Exception er){
            return "Could not remove the expense";
        }
    }

    @Override
    public Expense UpdateExpense(Expense expense){
    // calling our repo to get expense with id
        Optional<Expense> currentExpense = repository.findById(expense.getId());
        if(currentExpense.isPresent()){
    // using getters and setters to update values in selected expense
            Expense fetchedExpense = currentExpense.get();
            fetchedExpense.setName(expense.getName());
            fetchedExpense.setAmount(expense.getAmount());
            fetchedExpense.setCategory(expense.getCategory());
            try{
                return repository.save(fetchedExpense);
            }
            catch (Exception ex){
                throw new RuntimeException("Can't update expense");
            }
        }
        else {
            throw new RuntimeException("The expense does not exist");
        }

    }
}
Let’s take a closer look at what’s happening in the code. The @Service annotation tells Spring Boot to treat this class as a service and allows it to be injected into our controller.
We also add a variable that represents our JPA repository, which will handle the actual data operations saving, removing, and updating records.
Finally, we implement all the methods that our interface requires us to define.
As you already guessed, we are going to do the same thing for our Income service. We’ll create a new interface for Income and define what methods should be included. Then we’ll create the actual class that is responsible for implementing that interface.
This implementation should look very similar to the Expense interface and service class.
Income Interface: (goes to Interfaces package):
package com.budgetify.Interfaces;

import com.budgetify.Models.Expense;
import com.budgetify.Models.Income;

import java.util.List;

public interface IIncomeService {

    public List<Income> getAllIncomeSources();

    public Income addNewIncomeSource(Income incomeSource);

    public String RemoveIncomeSource(Integer id);

    public Income UpdateIncomeSource(Income income);
}
Income Class (goes to Services package):
package com.budgetify.Services;


import com.budgetify.Data.IIncomeRepository;
import com.budgetify.Interfaces.IIncomeService;
import com.budgetify.Models.Expense;
import com.budgetify.Models.Income;
import org.springframework.stereotype.Service;

import java.util.List;
import java.util.Optional;

@Service
public class IncomeService implements IIncomeService {

    private final IIncomeRepository repository;

    public IncomeService(IIncomeRepository repo){
        this.repository = repo;
    }

    @Override
    public List<Income> getAllIncomeSources(){
        return repository.findAll();
    }
    @Override
    public Income addNewIncomeSource(Income incomeSource){

        try{
            return repository.save(incomeSource);
        }
        catch (Exception ex){
            throw new RuntimeException("Can't save income");
        }
    }

    @Override
    public String RemoveIncomeSource(Integer id) {
        try{
            this.repository.deleteById(id);
            return "The income source was removed";
        }
        catch (Exception er){
            return "Could not remove the income source";
        }
    }

    @Override
    public Income UpdateIncomeSource(Income income) {
        Optional<Income> currentIncome = repository.findById(income.getId());
        if(currentIncome.isPresent()){
            Income fetchedIncome = currentIncome.get();
            fetchedIncome.setName(income.getName());
            fetchedIncome.setAmount(income.getAmount());
            fetchedIncome.setCategory(income.getCategory());
            try{
                return repository.save(fetchedIncome);
            }
            catch (Exception ex){
                throw new RuntimeException("Can't update income source");
            }
        }
        else {
            throw new RuntimeException("The income source does not exist");
        }
    }
}
As you can see, the logic is very similar to the Expense service. We have the @Service annotation, a reference to the Income repository, and we implement all the methods defined in the interface.
Adding JPA Repositories
As I mentioned before, we are not going to write SQL manually. Instead, we will use the magic of ORM — Object-Relational Mapping — and let the Java Persistence API handle all the heavy lifting for us.
To do that, we will create a special interface annotated with @Repository. This annotation tells Spring Boot that this is the component responsible for handling all database interactions for a specific table.
Remember, our tables are defined as entities in the Model package, and each model should have its own repository to manage it.
So, we are going to create a new package inside com.budgetify called Data. Inside the Data package, we will create two files: one for Income and another for Expenses. I’m going to name them IExpenseRepository.java and IIncomeRepository.java.
And here is how they should look:
// IIncomeRepository.java
package com.budgetify.Data;


import com.budgetify.Models.Income;
import org.springframework.data.jpa.repository.JpaRepository;
import org.springframework.stereotype.Repository;

@Repository
public interface IIncomeRepository extends JpaRepository<Income, Integer> { }
And this is how IExpenseRepository.java should look like:
package com.budgetify.Data;


import com.budgetify.Models.Expense;
import org.springframework.data.jpa.repository.JpaRepository;
import org.springframework.stereotype.Repository;

@Repository
public interface IExpenseRepository extends JpaRepository<Expense, Integer> { }
Both of our repositories have the @Repository annotation, and both extend JpaRepository with the table entity and ID type specified. The Integer here represents the primary key of our table.
public class Expense {

    @Id
    @GeneratedValue(strategy = GenerationType.IDENTITY)
    private Integer id; // this is why our JPA repository has <Expense, Integer>
    // rest of the Expense.java code...
}
Last Step: Seeding Data and running our app
Currently, we have no data in our database tables — no income and no expenses. To fix this, we can add a data.sql file that Spring Boot will automatically load and process, giving us some initial data.
Since our H2 database does not retain data after shutdown, the persistence is limited, but it is sufficient for now.
Next, we are going to add a script to populate our database. Find the resources folder and add a data.sql file. Inside it, place the following SQL:
-- Expenses
INSERT INTO EXPENSE (NAME, AMOUNT, CATEGORY, DATE) VALUES ('Groceries', 120.50, 'Food', '2025-11-01');
INSERT INTO EXPENSE (NAME, AMOUNT, CATEGORY, DATE) VALUES ('Electricity Bill', 75.20, 'Utilities', '2025-11-02');
INSERT INTO EXPENSE (NAME, AMOUNT, CATEGORY, DATE) VALUES ('Internet', 60.00, 'Utilities', '2025-11-03');
INSERT INTO EXPENSE (NAME, AMOUNT, CATEGORY, DATE) VALUES ('Gym Membership', 45.99, 'Health', '2025-11-04');
INSERT INTO EXPENSE (NAME, AMOUNT, CATEGORY, DATE) VALUES ('Movie Tickets', 30.00, 'Entertainment', '2025-11-05');

-- Income
INSERT INTO INCOME (NAME, AMOUNT, CATEGORY, DATE) VALUES ('Salary', 3500.00, 'Job', '2025-11-01');
INSERT INTO INCOME (NAME, AMOUNT, CATEGORY, DATE) VALUES ('Freelance Project', 850.00, 'Side Hustle', '2025-11-02');
INSERT INTO INCOME (NAME, AMOUNT, CATEGORY, DATE) VALUES ('Investment Return', 220.75, 'Investments', '2025-11-03');
INSERT INTO INCOME (NAME, AMOUNT, CATEGORY, DATE) VALUES ('Gift', 150.00, 'Other', '2025-11-04');
INSERT INTO INCOME (NAME, AMOUNT, CATEGORY, DATE) VALUES ('Bonus', 500.00, 'Job', '2025-11-05');
Now that we have our script, we need to let Spring Boot know that it should process the script before running our application. So, let’s update our application.properties file.
spring.application.name=Budgetify

# Add local development database config ()
spring.datasource.url=jdbc:h2:mem:testdb
spring.datasource.driverClassName=org.h2.Driver
spring.datasource.username=sa
spring.datasource.password=password
spring.jpa.database-platform=org.hibernate.dialect.H2Dialect
spring.jpa.defer-datasource-initialization=true

#Enabled console
spring.h2.console.enabled=true
spring.h2.console.path=/h2-console
spring.h2.console.settings.trace=false
spring.h2.console.settings.web-allow-others=false
We defined our database URL it’s local, and our database name is testdb.
Also, make sure your H2 console is enabled only for local development. Do not use these settings in production; instead, set spring.h2.console.enabled=false
Now we’re ready to run the app. I’m going to use the following commands:
mvn clean install
This command installs the Maven dependencies, and this one runs the app using the Maven build:
mvn spring-boot:run
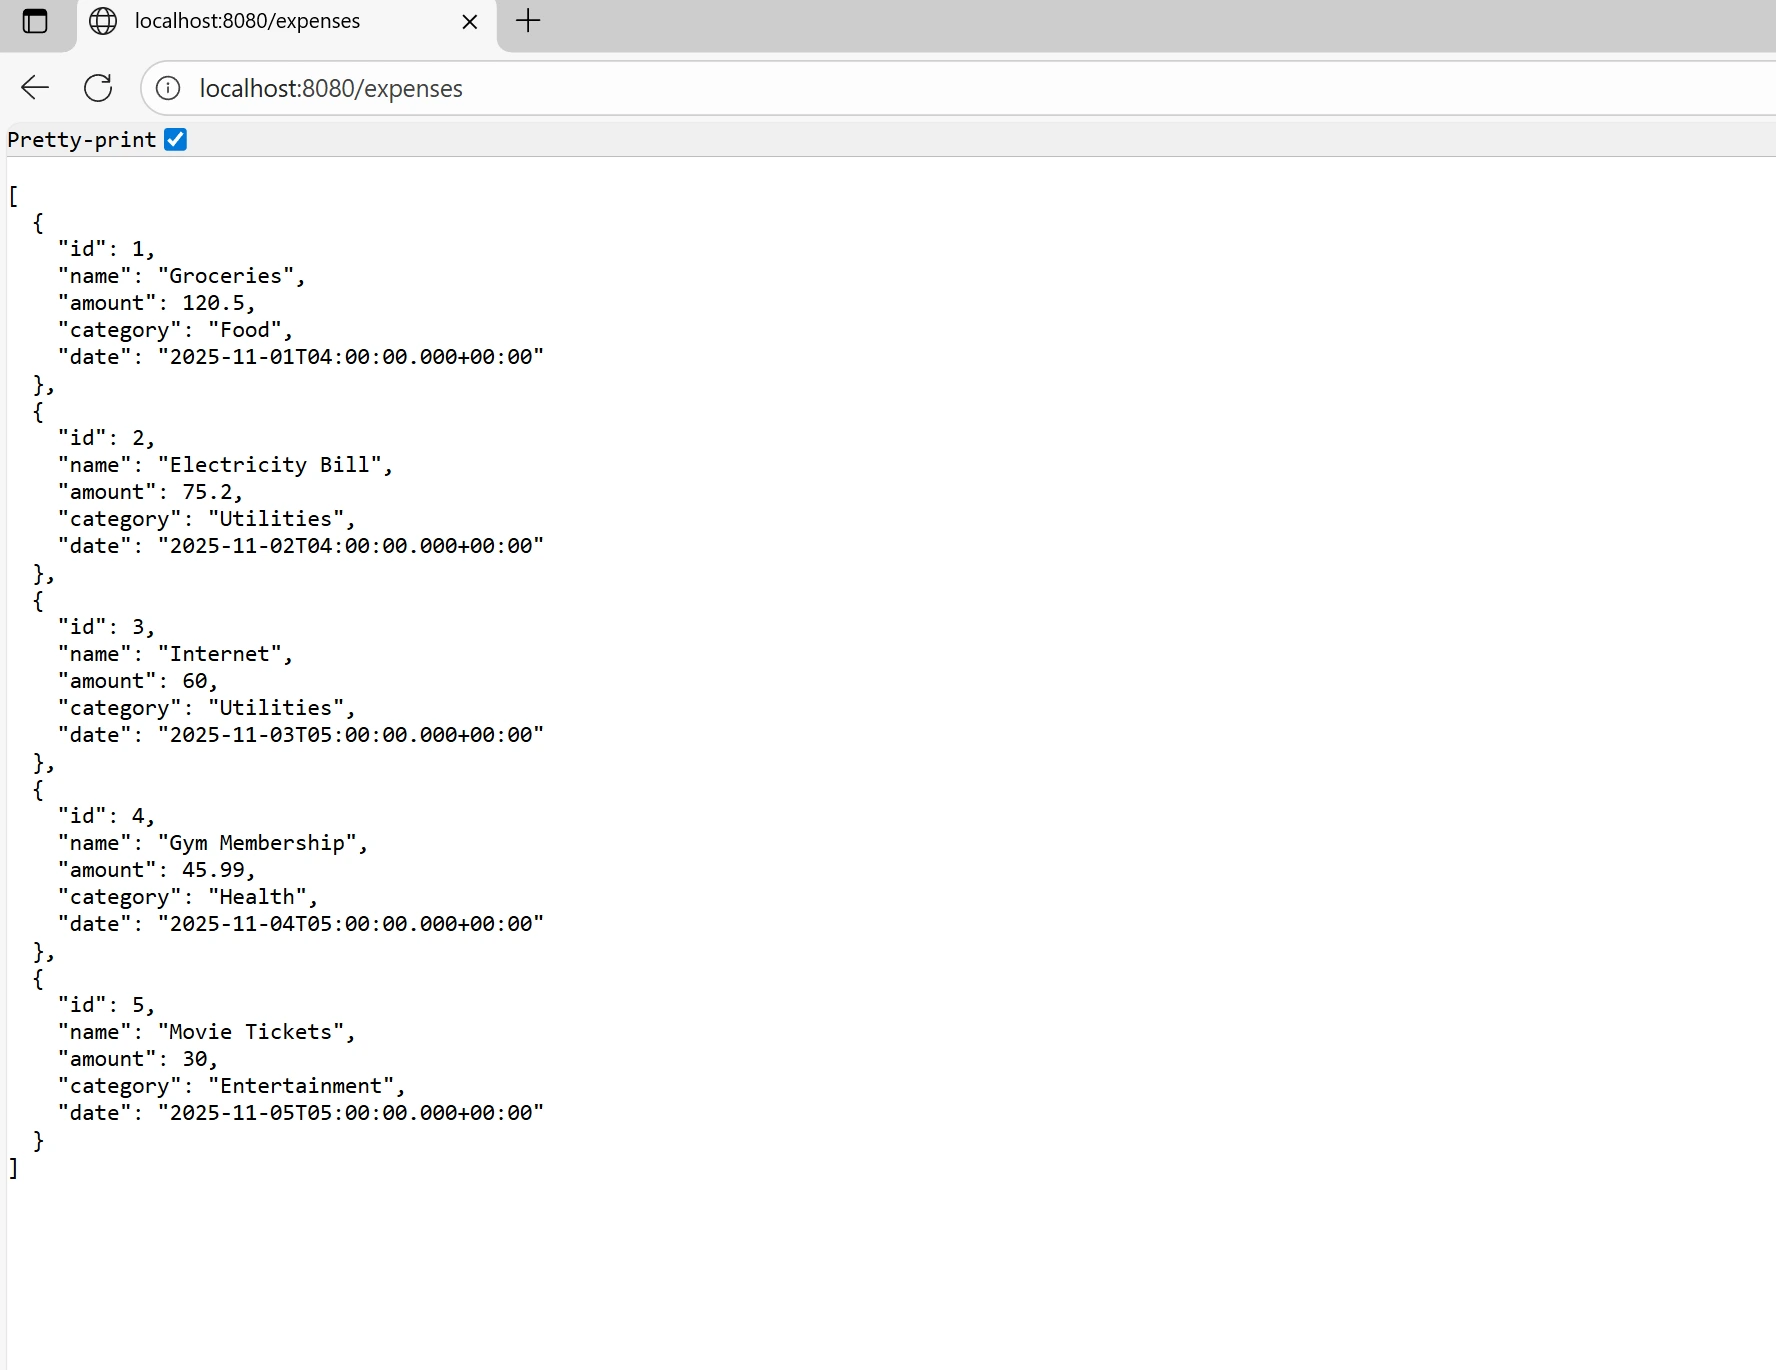
Let's check out the resuloutput-backendt! We'll visit localhost:8080/expenses in browser to see the data output from our H2 database.
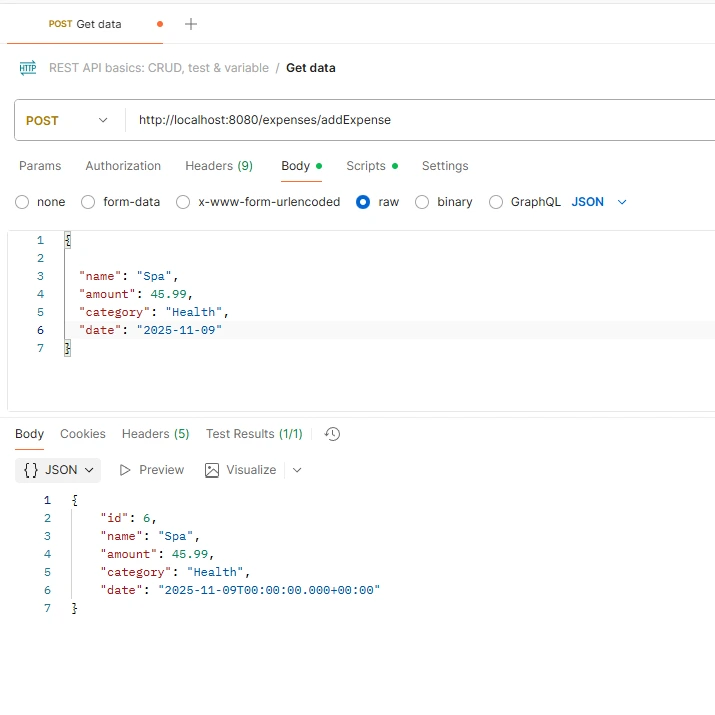
Awesome, you can also use POSTMAN to test your addExpense route, for example:
That's it for our backend part! Soon, I’ll post Part 2 — the frontend with React.
Before I let you go, I just want to remind you that I have a YouTube channel where I share hands-on tutorials that can help you learn even more effectively.
Thank you for reading, and Happy Coding 🚀!

Comments