

Good afternoon, future dev! This is Vlada, and today we’re going to dive deeper into the world of software engineering. Our topic is a version control system called Git. I hope you’ve got your coffee ready, because we’re going to learn a lot today!
Devs Life Before Git
When I first started learning programming, I didn’t really understand why I needed Git at all; I was just told it was good practice. Over time, I came to appreciate the power of this beautiful tool, and I’m excited to share it with you. Before we dive into Git’s functionality, let’s take a look back at the history of programming and see why Git was created in the first place.
Before Git, developers had to manually create lots of folders and save multiple copies of their code, with names like project_1_feature or project_1_final. Imagine how much work that was and now imagine this on a larger scale, with multiple devs collaborating. Yes, it was very challenging. However, Linus Torvalds saved the day by developing Git in 2005, which turned out to be a major invention.
To summarize, Git is a version control system that helps developers track changes to their files. You can see who wrote each piece of code, how it was modified, and compare it with previous versions. So, the worry of breaking existing code while working on a new feature - that’s a thing of the past, because Git is here to manage it.
Decentralized vs Centralized Version Controls
Centralized version control was used before Git was introduced. The idea was to have a single repository (think of it as the main storage for the code), so developers would check out the repository, make changes locally, and commit them back. This way, everyone worked from the same single version of the code, and you needed a connection to the server that stored it. Merging conflicts would be an everyday thing with this version control model. And the cherry on top—if the server went down, everyone was affected, losing access to the code.
Git, on the other hand, represents decentralized (or distributed) version control. This means every developer has their own copy of the code, along with the entire history of changes. You can create new branches to experiment with features, work offline without connecting to a server, and even if the main repository fails, you can continue working on your code.
Basic Commands and their usage
Now that we’re familiar with what Git is, I want to mention that you might find yourself not really needing Git if you work from a single computer at home. But if you work with a team, or have multiple devices that you use asynchronously for your project work, this is where Git becomes very helpful. I really appreciated it when I worked at home and in the office and had two computers that needed to reflect the same code changes.
Anyway, now I want to show you the most common commands for Git.
First of all, you need to install it. The link is here: Git Installment Link. During the installation, make sure to click to install the❗GitBash terminal.
After you’re done, you should find the GitBash terminal on your computer. I want you to launch it.
You might see, something like that:

You might see I typed: git --version
I would recommend you type the same thing and hit Enter to make sure the system sees Git as installed.
Now, I want you to create a new folder in a directory you would like to practice git, you can give it any name.
Little tip: you can create a folder in the opened GitBash terminal using the command
mkdir yourdirectoryname
See the result in my terminal:
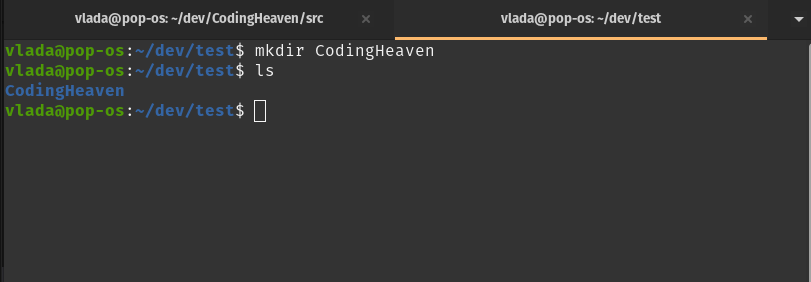
I used the ls command to check the files and folders inside my test directory. These commands are not Git-specific, but rather terminal commands.
Now, I want you to move to the newly created folder. For that, use this command:
cd yournewdirectoryname
cd here stands for change directory
Now, when you are in the right directory, /yourdirectoryName, we can actually try to use Git. Create a new file in yourdirectoryName; in my case, it will be the file index.js in the test directory.
Right now you just have a file, and version control is not applied to it yet. You have to tell Git to initialize a repository. For that, run the command:
git init
❗❗❗Make sure you are in yourdirectoryName before creating a repo. Avoid creating a repository in directories like Desktop or your hard drive root.
The git init command initializes a new repository and creates a .git folder that is hidden from you, but has all the important data about your code. Right now, Git will track all changes you are making in the directory.
For example, you can go ahead and create a new file, or change your index.js file and Git will keep track of it.
The next command we are going to explore is:
git add index.js
This command takes all tracked files that have changes and adds them to a staging area. This is the place that contains info about what changes are going into your next commit.
If you want to add all files, you can use the command git add .—yes, we have a period at the end.
To commit your changes, use the command:
git commit -m "My first Git commit"
This command tells Git to create a commit. This is like a point that can be used in the future to revert changes, for example. Every commit has a unique ID, and the -m flag means message. You have to make sure your commits are accurate and not super long.
When you want to work on a new feature, I would highly recommend doing it in a separate branch. You can create it with:
git checkout -b newBranchName
This command will create a new branch (-b) and move your working directory there. If you want to go back to any created branch, just use:
git checkout existingBranchName
Your first branch is likely named master or main, depending on what you selected during installation. Currently, devs use the main branch.
Git vs GitHub
You might have heard about GitHub before, and maybe you even used it. I just want to mention the difference between these two services.
Git is a version control tool, while GitHub is a platform for hosting your repositories. You can also find alternatives to GitHub such as BitBucket or GitLab. All of them are just platforms for hosting repos that are already managed by Git.
Push your code to GitHub
I am going to show you how to push your newly created repo and index.js into GitHub.
First of all, you need to create an account. You can use this link: GitHub Link
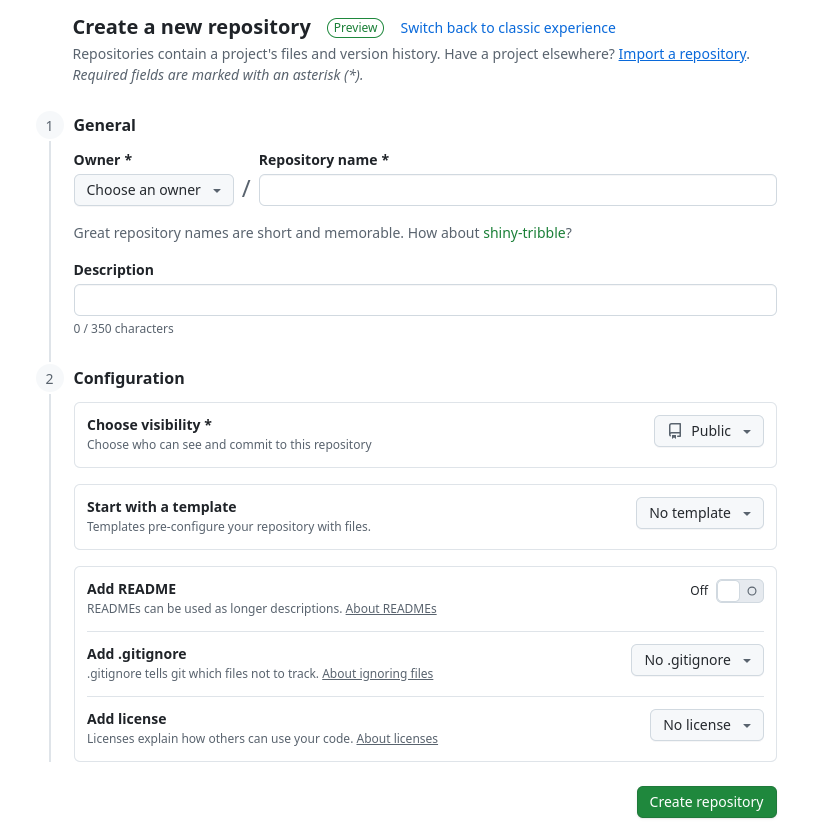
After you’re done, navigate to Profile → Repositories and click the New button. Give a name to your repo and click Create Repository.
After you set up your repo, you have two choices: either clone it to your local machine or link your existing repo to GitHub.
Cloning GitHub repo to local machine
Navigate to the desired directory and run the command:
git clone repositoryurl
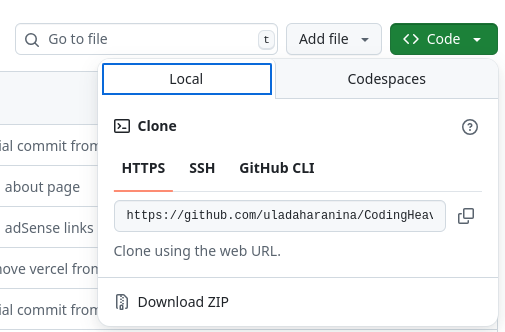
You can find your url by clicking on repo -> code -> HTTPS See the image below:
Linking existing local repo to GitHub
Navigate to your project directory and run the command:
git remote add origin repositoryurl
This should be enough for you to get started with Git. In future articles, I’ll show you more commands and we can talk in depth about it.
Don't hesitate to subscribe to my YouTube channel and Telegram to not miss any new content!
Thank you for reading, and Happy Coding! 🚀

Comments